Walkthrough
p. Shaman Village Cave to Contigo
SHAMAN VILLAGE CAVE
This cave is incredibly short and simple the first time through. You'll come to a 3-way fork at the first room; take the left fork and uncover some vines with Whirlwind. In the next room, just walk around the outer edge of this room and enter the next room (ignore the round rocks and Mercury Djinni here for now). In the next room, push the pillar to the right to open a shortcut through the cave, then hop over the gap and go on to the exit. Enter the town up ahead on the world map.
SHAMAN VILLAGE
Right off the bat, you'll notice that the people of Hesperia are extremely xenophobic. They won't even talk to you! You'll have to use Mind Read to find that their chief, Moapa, has outlawed speaking to any outsiders except their longtime friends from Contigo, telling them that they can't be trusted. Enter the Inn and go down the lower floor. Go through the lower left door to outside. Now go up and hop over the creek. Use Growth on the plant and climb up to the Spirit Gloves. Now go to the building next to the chest with the Gloves. As you try to enter, Chief Moapa himself (and two guards) comes out in front of you. They stress the point that they don't like intruders and tell you to leave. He says that if you have something to say, you should say it fast. Walk up to him and when the menu appears, show him the Shaman's Rod. The Chief is amazed (it is the SHAMAN'S Rod, and it is also called the Rod of HESPERIA) and says it was a gist to a past chief, thought lost forever. The Shaman's Rod represented a promise to take care of the Hover Jade, and they are charged to give the bearer of the Rod the stone. Moapa looks at each of you, puzzled, and says he won't give you the Hover Jade because you aren't Contigo. Kraden asks if there is some way they can get the Rod, and one of the guards suggests the "test". This test is Trial Road, and only the giver of the Rod to the old chief could walk it. He then walks off and asks for you to follow him. After you get your control back, follow Moapa and go through the next area. Talk to Moapa here to find that you need to make the sand here disappear to get the Hover Jade. Blow it away with Whirlwind and the pink statue. The chief is amazed you cleared the path and his guards say that Sheba must be the one from Contigo. Moapa almost seems in denial as Piers asks for the Hover Jade. He says that the sand was a test to see if you're worthy to take the test to obtain the stone (what a mouthful). You still must pass through Trial Road. The guards are amazed that Sheba will also be made to do the test. Sheba gets mad and asks if they are saying she can't be the chosen hero. Moapa says that the heroes have always been men, making Sheba even madder. You eventually taunt Moapa into letting you take the test, but he warns you that a great battle awaits you at the top. After you regain control, standby your Djinn for the battle ahead beforehand (I suggest putting 6 Jupiter, 4 Venus, 2 Mars, and 6 Mercury on standby) and go up to a clearing.
Moapa explains the rules to you now. The legends say that the past leaders of Contigo and Shaman Village tested each other's skills here in the road and fought on top of the mountain. Moapa then has his two guards demonstrate what to do. The rooms ahead are filled with traps and puzzles; you must use your Psynergy to pass them. To open each of the four doors to the next room, you'll have to put some items in the chests next to them. OMG OMG!!!! Felix actually talks!! He says his first word in the game "Why?" Anyway, the chief answers that the doors are locked until the chests are weighed down with the proper amount. The first person to each door must put in one item and the second has to put in two! To put an item in, open the chest and select use on an equipped weapon or armor. If you are feeling overwhelmed and want to start over, there is a button you can press to end the Trial and return to the clearing.
Before choosing a path to race on, climb the ladder to the left and go down to the Hard Nut. Now, choose your path (I recommend the left one, but it doesn't really matter; the 4 rooms you'll face are randomly chosen from the following 8). The starting timer counts down and the race begins! Run into the first room from the starting line. Because there is no definite order of the rooms, I will do separate walkthroughs for each room. Once you enter a new room, pause and check to see which one it is. Finally, DON'T WASTE YOUR TIME GETTING THE CHESTS. You can reenter the road after the race and get them.
Room 1 Defining Features: A huge sand waterfall Use Sand to get up the waterfall and get off on the right. Use Whirlwind to get rid of the leaves and climb the vine to reach the end.
Room 2 Defining Features: 3 rolling logs Push the bottom log and the second log left, then right into the water. Climb the vine to the right and then climb down to in the enclosure made by the logs. Push the pillar up and to the right as far as it will go and push the bottom log back down. Push the other log right into the water and hop across it. Climb the vines to the next area.
Room 3 Defining Features: 5 pillars, 2 of them vine-covered Ignore the viney pillars; push the center free pillar down and the other 2 towards the center one. Climb the vine to the right, hop across, and climb another to the next area.
Room 4 Defining Features: 2 water geysers Align the pillar with the two water geysers, climb a vine, and hop across the water geysers when they are shooting water, then go to the next area.
Room 5 Defining Features: 4 Poundable pillars, only 2 raised at a time Use Pound on both of the pillars to switch them with their nearby counterparts and push the two vine-free pillars onto where the Pounded pillars were. Then hop to the next area.
Room 6 Defining Features: 4 pillars in long tracks; 1 vine-covered Push both lower pillars up to align with the other two and hop across. Push the pillar up here to the left and climb the vine.
Room 7 Defining Features: 2 Burst pillars Use Burst on the right-hand pillar, hop up to the vine, and climb it to the next area.
Room 8 Defining Features: 2 torches and 2 ice pillars Pull the 2 pillars 1 space south each with Move and then push the left torch next to the corresponding pillar to melt it. Push the torch away, jump over the puddle, and refreeze it. Then go up the vine ahead and hop over the pillars and climb the last vine.
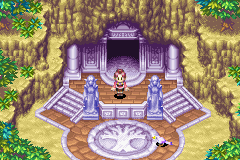
After you have cleared 4 randomly selected rooms, you will climb some stairs in the last room to the peak of the mountain. Climb the vine and hop over to the strange circle. Moapa and his guards appear and, as prophesized, they battle you.
BOSS BATTLE: MOAPA AND KNIGHTS
Since when are Indian warriors called "knights"? Anyway, if you followed my standby tips before Trial Road, you can Summon 2 Eclipse, Judgement, and Ulysses. Like all other human enemies, Moapa and his guards are equally weak to every element. The Summons should take away quite a lot of his HP (remember to focus on Moapa). After that, have Jenna heal with her Aura spells and the others attack. The Indians should go down soon after the initial Summon rush. Be warned, though; Moapa and his knights love attack items like Bramble Seeds and Crystal Powder. They can be quite damaging, so always keep your party well- healed.
After you beat Moapa, he gives you the Hover Jade as promised. Everyone then goes back to the village to rest. After you get up, you'll find that every building is unlocked and everyone will talk to you! Go to a two floor house on the eastern part of town and exit through the second floor door. Go around on the path to a pillar behind a rock. Use Move to get it into the pit. Then go to the basement of Moapa's house and exit. Use Lash and climb up the rope. Follow this path around to the east and hop across the pillar. Go and get the Jupiter Djinni, Aroma ahead! Also, check the Shaman's teepee in this area. One of the jars inside holds some Lucky Pepper. Check the Shop and also return to Trial Road to pick up the items you missed. Now, exit Shaman Village when ready. Go back through the cave and get on your boat. Sail back out to the ocean and head northeast along the coast to another river in between two sandbars. Sail up it a long way to a fork. Because the lower path leads nowhere, take the north one and get out on the north side of the river once you pass the small mountain. Walk around on the ribbon like strip of land's forest until a Venus Djinni appears. Defeat Petra and have it join you, then sail to the continent south of Hesperia. Get off on either of the two beaches on the west side of the continent (Atteka) and go north or south depending on which beach you got off on. When you can take a long, forested path right a little way north of the lower beach, do so. Follow this peninsula to its end and walk around in the large forest on it until a Mars Djinni, Core, appears, Once again, beat it to have it join you and return to your boat. Go to a river in between two sandbars on the east side of Atteka and sail into it. Take the left path at each of the forks (your left, not the ship's) and you should end up inside a reef visible from the ocean. Sail up and enter...
ATTEKA INLET
Some people have brought a giant wing here according to a prophecy. They say they'll attach them to the sacred vessel when Mt. Jupiter is lit (could they mean Jupiter Lighthouse?). Maybe the sacred vessel is your ship... you'll have to beat the next dungeon to see! Before leaving, go up the ladder left of the house in the next area and follow the cliff path around to a Vial near the wing. Notice the strange spider-like symbol on the arch leading back to the world map. After you leave, go northeast to a town next to a HUGE crater.
CONTIGO
The people of Contigo are all descended from the legendary Anemos civilization, and some have even inherited their wind Psynergy power. The Anemos had the ability to hover in the air and see into the future, but they're dead now. However, the two siblings who now possess this power have left Contigo. You'll learn that one of those siblings was taken by a man named Hammet: Ivan! So Ivan is Contigo; who is his sibling? Whoever the sibling is he or she seems to be more powerful than Ivan. To the right of the village, on the edge of the huge crater, you will find the temple of the Anemos, a geoglyph of the sacred vessel, and the other wing, still under construction. Besides the prophecy of the winged vessel, there is also a prophecy that when the power of the Anemos is lost, a group of heroes will come to light the Jupiter Lighthouse beacon. Could that mean you? You also find that Contigo and Shaman Village have not always been allies. The friendship was formed between the two through constant war. And finally, it's finally time to use your Game Tickets at the Contigo Slots! There are also two dice games that you can win coins with. Now that you know the facts, time to get a Djinni. Go to a large patch of weeds east of the entrance to the town. Don't use Cyclone; use Scoop in the only clear area in the middle of the weeds to unearth Salt, which joins you without a fight! Once you have checked out the shops and used your Game Tickets, (also, go to the Anemos Temple and use Reveal to find that the center door is open, then enter and follow the halls to reach a Dragon Skin), you can head out of Contigo and go northeast to Jupiter Lighthouse.