2) The Game
2.10) Construction Ahead (DrillMan)
You'll learn that Alpha is being stolen. Rush to SciLab 1! Erm...cut to SciLab
1! DrillMan is at the Tetra Gates, which are the four orange doors in SciLab 1.
Bet you were wondering what that weird orb was! Drilling through the four Tetra
Gates, DrillMan successfully steals Alpha and drills a hole in time-space to
Undernet 5. Go to SciLab 1 when you regain control of Lan and pass through the
hole into Undernet 5. DrillMan is very near. Navigate the area until you run
into him.
--BOSS--
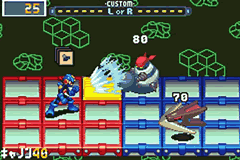
DRILLMAN.EXE
HP: 600
-Attacks-
Drill Drive: Three holes will appear in DrillMan's area. Two regular drills will
pop out of two of the holes, and DrillMan will pop out of the third. (80 dmg)
14 Drills: Fourteen drills will pop out randomly from three holes in DrillMan's
areas. The drills can be destroyed with the proper NaviCust program. If you
shoot into an empty hole during this attack, DrillMan will take damage! (80 dmg)
Drill Demolition: DrillMan and two other drills will burst through three of your
tiles, then three rocks will fall down on random remaining tiles. (80 drill/60
rock dmg)
-Notes-
DrillMan protects his head with a near-unbreakable drill, so the only time you
can injure him, outside of the 14 Drills attack, is from the side with swords,
or with a ranged penetrating attack such as Heat style's Flamethrower. With
BrakBstr in your NaviCust, you can destroy the drill and leave his head open to
attack. Also, if you paralyze DrillMan, he will remain still and vulnerable
until the paralysis wears off.
When you defeat DrillMan, he drops Alpha. As you're going to pick it up, Forte
arrives and steals it for Wily. You decide to use the Forbidden Program on Forte
to stop the spread of Alpha. Forte catches it in one hand! Megaman deduces that
Forte is also a Chosen One. Forte, impressed with your prowess, decides to let
you live and leaves with Alpha. Cut to Wily's lair, where he summons all his
minions together to witness Cybergeddon.
2.11) Peer-to-Peer Peril (Alpha)
Cut to Lan, in Cyberworld. Megaman says goodbye, which Lan cannot handle. He
tries to chase after his Navi, but he can't move! Cut to Lan's room. Lan is in
his bed. What you just saw was a nightmare. Nevermind that now. Outside, and all
over Electopia, the Electopian Army has moved in. However, the tanks, like
everything currently on the net, can fall victim to Alpha. Talk to Dex, Mayl,
and Yai, who are in front of the school, in the park, and in front of the
MetroLine station, respectively. You'll get Rollv3 R from Mayl. Once you talk to
all of them, you'll get email from SciLab, regarding a meeting to be held
concerning the WWW. Go to Blues in SciLab Square to get an OfclPass which will
allow you to ride the MetroLine. Once you have it, go to Dr. Hikari's lab, where
you'll discover that Alpha is actually the Internet! In the middle of the
meeting, an alarm will go off. Just like I told you, the tanks in ACDC are going
nuts.
Go back to ACDC and walk the direction the people outside the MetroLine are
facing. Your friends are under attack! You need to jack in to stop whatever's
making it go crazy. You do so automatically. Look for the blue amoeba along the
walls and fight and destroy it. A cutscene saying how odd that virus was will
play immediately after the amoeba's defeat. After some more cutscene, you'll
find that army systems all over the world have been infected with AlphaBug,
pieces of decoded Alpha! More cutscene, then you find your dad has left the
hospital. Go to his room and his mom will give his medicine. Search his bed to
find a note and an ID card. The card opens the previously locked door in Dr.
Hikari's lab. Go there and your dad will be looking for Alpha in that room. He
will, after a cutscene, track down the location of the WWW base and say that it
must be reached by boat. The boat at Beach Street would do nicely, if it weren't
for the pathetic motor. But hey, Yai is rich. Maybe she can afford one. And of
course, "maybe" always means "yes". Ask Yai about it and, after a bit of
convincing, she'll install it on the boat for tomorrow. For now, head to bed.
Cut to Wily's lair. He's congregated the members to destroy the internet
entirely. After a chorus of "DELETE IT!", cut to Lan's room. You get an email
from Dad with the Alpha NaviCust program. Install it to see where Alpha is on
the floor. It doesn't seem important now, but it will be very shortly. Go over
to Beach Street and a glorious sendoff to WWW Island. You take Dex, Chaud, and
Tora with you. When you land, the three run ahead. Catch up with them in the
room behind the door at the end of your path. Check the elevator in this room to
find that it's not operational. There aren't any places to jack in, either. When
all seems lost, the man who helped with your PresData shows up to save the day.
He introduces himself as Dr. Cossak and uses the strange machine in the center
of the room to synchronize himself with a nonexistant Navi and turn on the
elevator that way. Just so I don't spoil anything more, I'm not going to
describe this cutscene further. Go up the elevator to the second level of the
island. Walk to the next door and a strange tank that looks like those in ACDC
will interrupt you. It'll try to use Hypno Flash on you, but Tora will come up
with a genius plan. You'll automatically jack in to the robot.
You'll fight through four of these robots, so get used to it. Install Alpha as
soon as you regain control if you haven't already. The purple things with claws
will remove you upon stepping into their shadows, and if you step into Alpha,
they will remove you, as well. In this tank, you'll fight primarily electric
enemies, because it's FlashMan's Tank. Go forward, past two claw robots, and
turn left. Take the path without Alpha to the BMD, or just skip it and move to
the next claw robot section. Dodge the claw robots to get to the second trash
area. Any claw robots you encounter will drop you there now, instead of at the
beginning. Take the teleporter at the end of this fairly straightforward path.
Walk with the three claw robots to the end of the straight path. You'll pick up
ID-DataA for the laser door nearby. Here, you need to fight FlashMan Alpha. 500
HP, but nothing difficult. When you trash him, FlashMan will try his Shining
Browser Crasher again, but KingMan will crush him before he gets the chance.
Enter the door in front of you to reach Wily's lair. Check both Wily statues,
then check the one on the right until it falls into the water. Check Wily's desk
for a Magnum1 V, a decent chip that you should add to your folder. Walk through
the elevator and upwards to encounter a BubbleMan tank. You'll fight Aqua
viruses here, naturally. It's smooth sailing until you reach the large square
with the claw bots zooming by at supersonic speeds. To dodge these, run
clockwise and into every small alcove to dodge the robots. Leave each alcove as
soon as you see a robot zoom past. When you reach the central platform, take the
teleporter. You have to fight BubbleMan Alpha. Aside from having 800 HP, he's
got no new tricks and he's just as annoying. He's not the one controlling the
tank, though. Continue the assault through the tank. Pick up the ID-DataB below
the large blue platform past the teleporter. The door waits to the left of the
platform with ID-DataB. Beyond that door, you'll have to fight DesertMan Alpha.
1200 HP, nothing else new.
Go down the ramp after finishing up in the tank for some Indiana Jones action.
At the bottom of the ramp, you'll have to deal with a FlameMan tank. Commence to
the second trash deposit platform, then walk upwards, avoiding the claw robots
and the Alpha pools. Go to the left and walk with and between the two claw bots
to come upon ID-DataC. Go over to the purple door which will now open with ID-
DataC. The first chain of clawbots is the toughest you've faced so far. Wait for
the singular one to move to the top of the platform, then carefully walk through
the two sets of two clawbots. Move as quickly as possible past the last set to
solid ground again. Here, you have to take on both PlantMan and FlameMan in a
two-shot endurance battle. They are both just the regular, scenario-encountered
versions of the Navis, though, so you are definitely prepared for what's coming.
When you defeat them both, Chaud will be safe from the flames. Enter the large
door in front of you and go up the ramp. Try to go through the door and you will
be stopped by a DrillMan tank.
This is the toughest tank yet, in relativity to the tanks in general. You can
easily dodge the first two clawbots by sticking to the alcoves without Alpha in
them. After that portion, there are several conveyors with clawbots between
them. You have no room for error, so you have to time the path through the
clawbots precisely. Go up from the end of that section, then to the square
platform with four clawbots circling rapidly around it. As you see one zip by,
dash forward to the teleporter in the center. Take the other path out of the
central platform first to find ID-DataD. When you get it, take the teleporter
and open the door. Here, wait for the first four clawbots to move up in unison,
then dash forward to the last three clawbots, then forward again to DrillMan.
He's still scenario-version.
When you defeat DrillMan, you'll be able to enter the innermost sanctum of the
lair. From this point on, you won't be able to save your game, so SAVE NOW,
BEFORE ENTERING THE DOOR! Enter the door and a long cutscene will ensue, after
which you will go Full Synchro with Megaman. Run to the top of the area you're
now in to encounter the Guardian Program, Wily, and Forte. You need to fight two
very difficult boss fights in a row now, so get ready!
--BOSS--
Forte
HP: 1000
-Attacks-
Air Burst: Forte will align himself with you and shoot an air burst down your
row. (100 dmg)
Air Explosion: Forte will charge his buster and shoot several air bursts down
all the rows randomly. He will regenerate his aura after this attack! (100 dmg
per burst)
Power Crusher: Forte will slam the column on which you're standing. If you're
not on a panel in that column, it will break. He will regenerate his aura after
this attack! (100 dmg)
-Notes-
Forte has a LifeAura that takes a single hit of 100 damage or more to break. He
will regain said aura after both the Air Explosion and the Power Crusher
attacks. If you manage to stun him during the execution of either of these
attacks, he'll stop the attack and not regain his aura.
Now that Forte is out of the picture, you need to face the Internet itself,
Alpha.
--FINAL BOSS--
ALPHA
HP: 2000
-Attacks-
Cyber Claw Swipe: Alpha will launch a claw down the column, then the row, on
which you're standing. (50 dmg)
Cyber Laser Blast: Alpha will shoot a laser at the center panel of the first
column in your area. The laser sends shockwaves up, down, and forward, which do
the same damage as the laser. (80 dmg)
Cyber Bullet Barrage: Alpha will start shooting shoulder-mounted guns at you
which track your every move. To avoid this attack, constantly move around your
area. (20 dmg)
Alpha Arm Sigma: When low on HP, Alpha will extend a giant lightning rod which
shoots lightning at the center row, then the outward two rows, then the center
row, etc. for several seconds. The lightning rod has 500 HP and can be
destroyed. (60 dmg)
Alpha Arm Omega: When low on HP, Alpha will shoot a gigantic missile that will
explode and damage anything standing in the last two columns of your area. (100 dmg)
-Notes-
You cannot damage Alpha unless you expose its core by shooting the gel-like
substance at the center of Alpha. You also cannot steal any panels from Alpha
because it takes up the entire enemy area. Any chips which do enough damage to
normally expose the core and deal more damage to Alpha, but do not deal the
damage in realtime (IE the screen darkens upon use of that chip) would only
expose the core, but not do any actual damage to Alpha.
Once you defeat this hulking behemoth of a program, sit back and watch the
ending. But your adventure is far from over. Oh, quite far indeed...
|